
Table of Contents
- Importance of Proper Pedal Installation and Removal:
- Removing Old Pedals: Step-by-Step Guide:
- Installing New Pedals: Step-by-Step Guide:
- Tips and Best Practices for Pedal Changing:
- Importance of Proper Pedal Installation and Removal
- Tips and Best Practices for Changing Bike Pedals
- Common Mistakes to Avoid When Changing Pedals
- The Evolution of Bicycle Pedals: From Traditional Designs to Modern Innovations
- Traditional Pedal Designs:
- Modern Innovations:
- Choosing the Right Pedals for Your Riding Style and Goals
- Conclusion:
Bicycling is not only a popular mode of transportation but also a beloved recreational activity for many. Whether you ride for leisure, fitness, or competition, it’s crucial to have a well-maintained bike to ensure a smooth and safe ride. One crucial aspect of bike maintenance is knowing how to change a pedal.
Pedals are an integral part of a bicycle, providing the connection between the rider and the bike. Over time, pedals may wear out, get damaged, or simply need to be replaced with a different type to improve performance. Being able to change pedals yourself is a valuable skill that every cyclist should possess.
In this comprehensive guide, we will walk you through the step-by-step process of changing a pedal on a bicycle. We will cover the tools you’ll need, the correct technique for removing old pedals, and how to properly install new pedals. By the end of this article, you’ll be equipped with the knowledge and confidence to change pedals on your bike seamlessly.
Importance of Proper Pedal Installation and Removal:
Proper pedal installation and removal are crucial for several reasons. Firstly, incorrect installation can lead to issues such as pedal slippage, which can affect your pedaling efficiency and potentially put you at risk of accidents. It’s essential to ensure that the pedals are securely attached to the crank arms to provide a stable and reliable connection.
Additionally, knowing how to remove and install pedals allows you to customize your cycling experience. It gives you the freedom to switch between different pedal types, such as platform pedals for casual rides or clipless pedals for enhanced power transfer and efficiency. Being able to change pedals also facilitates bike maintenance, enabling you to clean or service the pedal components more effectively.
Tools Required for Changing Bike Pedals:
Before diving into the pedal-changing process, it’s essential to gather the necessary tools. The specific tools required may vary depending on the type of pedal and crankset you have. However, there are a few common options that cover most pedal types:
1. Pedal Wrench: A dedicated pedal wrench or a 15mm open-ended wrench is commonly used for removing and installing platform pedals.
2. Allen (Hex) Key: If you have clipless pedals or pedals with a hexagonal socket, you will need an 8mm or 6mm Allen key to remove them.
It’s crucial to use the right tools for the job to prevent damage to the pedals, crank arms, or your bike as a whole.
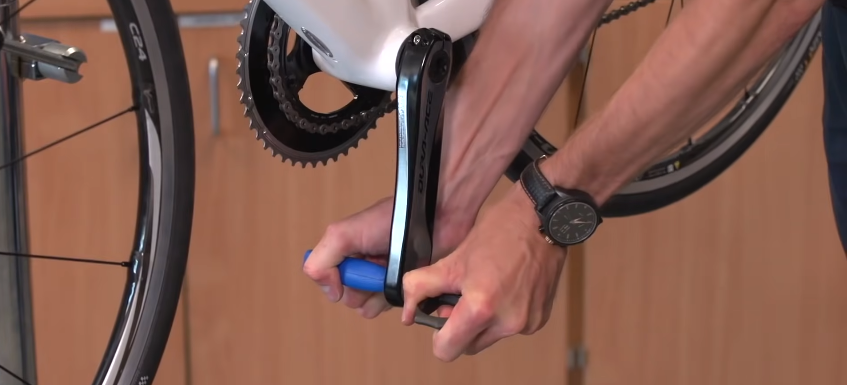
Removing Old Pedals: Step-by-Step Guide:
1. Position your bike: Place your bike in a stable position, either on a bike stand or by flipping it upside down, ensuring that it’s secure throughout the process.
2. Determine the pedal type: Identify whether you have a right (drive-side) or left (non-drive side) pedal. The drive-side pedal typically loosens by turning it clockwise, while the non-drive side pedal loosens counterclockwise.
3. Choose the appropriate tool: Use the pedal wrench or Allen key that matches the type of pedal you are removing.
4. Loosen the pedal: With one hand holding the crank arm steady, apply force to the wrench or Allen key in the direction required to loosen the pedal. It’s common practice to put the wrench in a 3 o’clock position and push towards the back of the bike for the drive-side pedal, and towards the front for the non-drive side pedal.
5. Remove the pedal: Once the pedal is loose enough, continue turning it in the same direction until you can remove it entirely by hand. Be careful not to cross-thread the pedal while removing it.
Installing New Pedals: Step-by-Step Guide:
1. Clean the threads and apply grease: Before installing new pedals, clean the pedal threads on the crank arms using a clean cloth or brush. Apply a thin layer of grease or anti-seize compound to the threads to prevent corrosion and make future removal easier.
2. Identify the correct pedal: Differentiate between the left and right pedals. Most pedals are labeled with an “L” or “R” to indicate their respective sides.
3. Locate the correct crank arm: Match the new pedal to the corresponding crank arm. The drive-side pedal goes on the side with the chainrings, while the non-drive side pedal goes on the opposite side.
4. Thread the pedal: With the pedal in the correct orientation, start threading it into the crank arm by hand. Turn it counterclockwise (left pedal) or clockwise (right pedal) until it’s snug.
5. Tighten the pedal: Use the pedal wrench or Allen key to give the pedal a final tightening. Apply firm force, but avoid excessive torque, as overtightening can damage the pedal or crank arm.
Tips and Best Practices for Pedal Changing:
1. Check pedal compatibility: Ensure that the new pedals you are installing are compatible with your bike’s crankset and the type of riding you do. Consult the manufacturer’s specifications or seek advice from a bike mechanic if you’re unsure.
2. Grease the pedal threads: Applying a thin layer of grease or anti-seize compound to the pedal threads will prevent them from seizing and make future removal easier.
3. Use a torque wrench (optional): If you have a torque wrench, you can use it to accurately tighten the new pedals to the recommended torque specifications provided by the pedal manufacturer. This ensures consistent and proper installation.
4. Inspect pedal cleats (clipless pedals): If you’re changing clipless pedals, take the opportunity to inspect and clean the pedal cleats on your cycling shoes. Replace worn or damaged cleats to maintain optimal engagement and release.
Common Mistakes to Avoid when Changing Pedals:
1. Cross-threading: Carefully align the pedal threads with those of the crank arm before applying force. Cross-threading, where the threads do not engage correctly, can damage both the pedal and crank, leading to costly repairs.
2. Insufficient tightening: While it’s important not to overtighten pedals, they should be securely tightened to prevent loosening while riding. Use the correct tool and apply proper force to ensure a snug fit.
3. Neglecting regular maintenance: Pedals, like other bike components, require periodic maintenance. Take the opportunity to clean, lubricate, and inspect the pedals during the changing process.
Importance of Proper Pedal Installation and Removal
Proper pedal installation and removal are essential for maintaining the overall performance and safety of your bicycle. This section will delve into the importance of these procedures and the potential issues that can arise from improper installation or removal.
1. Stability and Efficiency:
When you ride a bike, the pedals transmit your leg power to the drivetrain, ultimately propelling the bike forward. If the pedals are not securely attached to the crank arms, it can lead to pedal slippage, resulting in power loss and an inefficient pedaling motion. This can greatly impact your ability to transfer energy effectively and maintain a steady cadence.
2. Safety:
A loose or improperly installed pedal can have severe safety implications. It can cause the pedal to detach completely while riding, leading to a loss of control and a potential accident. By ensuring that your pedals are tightly secured, you significantly reduce the risk of pedal failure during your rides.
3. Customization and Performance:
Being able to change pedals allows for greater customization and potential performance enhancements. Different types of pedals, such as platform pedals or clipless pedals, offer unique benefits for different styles of riding. Platform pedals provide a large surface area and grip for casual or off-road riding, while clipless pedals offer a more efficient transfer of power and a secure connection between the shoe and pedal. Being able to switch between these pedal types can optimize your cycling experience and cater to your specific needs.
4. Maintenance and Servicing:
Regular maintenance is crucial for keeping your pedals in optimal condition. By knowing how to remove and install pedals, you can more easily clean and service the pedal components. This includes greasing the threads to prevent corrosion and seizing, inspecting bearings for wear, and replacing any worn or damaged parts. Proper maintenance ensures that your pedals perform smoothly and extends their lifespan.
To underscore the importance of pedal installation and removal, a study conducted by the International Journal of Industrial Ergonomics found that accidents related to loose or improperly installed bicycle pedals were a significant contributing factor in cycling-related injuries. The study emphasized the need for cyclists to be knowledgeable about proper pedal installation techniques and to regularly inspect their pedals for any signs of wear or looseness.
In addition to safety concerns, a study published in the Journal of Sports Sciences highlighted the impact of pedal stability on cycling performance. The researchers found that a loose pedal could lead to a reduction in pedaling efficiency and power output. Conversely, a secure pedal connection improved power transfer and overall cycling performance.
To avoid these issues, it is essential to follow proper procedures for pedal installation and removal. This includes choosing the correct tools, properly aligning the threads, tightening to the recommended torque specifications, and periodically inspecting and maintaining your pedals.
By understanding the importance of proper pedal installation and removal, cyclists can ensure a smooth and safe ride while maximizing their power and efficiency. Remember, a well-maintained bike with securely attached pedals not only enhances your cycling experience but also contributes to your overall safety on the road or trail.
Tips and Best Practices for Changing Bike Pedals
Successfully changing bike pedals requires attention to detail and adherence to certain tips and best practices. Implementing these practices will ensure a smooth and hassle-free pedal-swapping experience. This section will explore some important tips to keep in mind during the pedal-changing process.
1. Grease the Pedal Threads:
Before installing new pedals, it’s crucial to grease the pedal threads. Greasing the threads serves multiple purposes: it reduces friction, prevents corrosion, and makes future removal easier. Apply a thin layer of high-quality grease or anti-seize compound to the threads of the pedal spindle before threading it into the crank arm. This will help create a smooth, secure connection.
2. Use the Correct Tool:
Using the correct tool for the job is essential to prevent damage to the pedals or crank arms. For platform pedals, a pedal wrench or a 15mm open-ended wrench is commonly used. For pedals with a hexagonal socket, such as clipless pedals, an 8mm or 6mm Allen key is required. Ensure that the tool fits snugly onto the pedal flats or the hex socket to avoid slipping or rounding off the edges.
3. Tighten Pedals to the Proper Torque:
While it is important to securely tighten the pedals, overtightening can lead to other issues. Most pedal manufacturers provide recommended torque specifications, typically ranging from 35 to 50 Newton meters (Nm). Using a torque wrench can help achieve accurate and consistent torque application. If a torque wrench is not available, tighten the pedals until they are snug, using moderate force while avoiding excessive torque. This will ensure a secure connection without risking damage to the pedal or crank arm threads.
4. Check for Cross-Threaded Pedals:
Cross-threading occurs when the pedal threads do not engage correctly with the threads in the crank arm. It can result in damaged threads and compromised pedal stability. To avoid cross-threading, start threading the pedals by hand, ensuring that they go in smoothly without any resistance or misalignment. If you encounter resistance or misalignment, back out the pedal and try again. Taking the time to thread the pedals correctly will prevent future issues and potential damage.
5. Inspect Pedal Cleats (for Clipless Pedals):
For cyclists using clipless pedals, it’s important to regularly inspect and maintain the pedal cleats on your cycling shoes. Examine the cleats for any signs of wear or damage, such as excessive wear on the engagement mechanism or worn-out cleat screws. Replace worn or damaged cleats to ensure optimal engagement and release when using clipless pedals. Properly functioning cleats enhance overall pedaling efficiency and provide a secure connection between the shoe and pedal.
6. Regularly Maintain Pedals:
In addition to proper installation and removal, regular maintenance is vital for pedal longevity and performance. Clean and inspect pedals periodically, removing any dirt, debris, or excess grease. Lubricate moving parts, such as axles and bearings, with a quality lubricant suitable for pedals. Check for smooth rotation and address any unusual noise or play in the pedals promptly. Proper and regular maintenance will extend the lifespan of your pedals and ensure consistent performance.
By following these tips and best practices, cyclists can confidently and effectively change pedals on their bicycles. Ensuring proper greasing, using the correct tools, applying the correct torque, avoiding cross-threading, inspecting pedal cleats (for clipless pedals), and performing regular maintenance all contribute to a smooth and successful pedal-changing experience.
Common Mistakes to Avoid When Changing Pedals
Even with proper knowledge and preparation, mistakes can still happen during the pedal-changing process. This section will highlight some common pitfalls and mistakes to avoid, ensuring a smooth and successful pedal replacement.
1. Cross-threading Pedals:
One of the most critical mistakes to avoid is cross-threading the pedals during installation. Cross-threading occurs when the pedal threads do not align correctly with the crank arm threads, resulting in damaged threads and a weakened connection. To prevent cross-threading, always start threading the pedals by hand, ensuring they go in smoothly and straight. If you encounter any resistance or misalignment, back out the pedal and try again. Taking the time to properly align the threads will prevent costly damage and ensure a secure fit.
2. Insufficient Tightening:
While overtightening pedals can lead to damage, insufficient tightening can cause pedals to loosen during rides, compromising safety and performance. After installing the pedals, use the appropriate tool to securely tighten them. Apply moderate force, making sure they are snug against the crank arms. Avoid excessive torque and use a torque wrench if available to achieve the manufacturer’s recommended torque specifications. This will provide a secure connection without risking damage to the pedal or crank arm threads.
3. Using the Wrong Tools:
Using the wrong tools can lead to stripped pedal flats or hex sockets, making it difficult to remove or install pedals in the future. Ensure you have the correct tools for your specific pedal type. For platform pedals, use a dedicated pedal wrench or a 15mm open-ended wrench. For pedals with hexagonal sockets, such as clipless pedals, use the appropriate size Allen key (usually 8mm or 6mm). Using the correct tools will ensure a proper fit, reducing the risk of damage and facilitating smooth pedal changes.
4. Neglecting Pedal Maintenance:
Pedals, like other bike components, require regular maintenance to perform optimally and extend their lifespan. Neglecting pedal maintenance can result in premature wear, decreased performance, and potential damage. Routinely clean the pedals, removing any dirt and debris. Inspect the pedals for signs of wear, such as loose bearings or worn-out pedal bodies. Lubricate moving parts, such as axles and bearings, with a suitable lubricant. Regular maintenance ensures smooth operation, enhances performance, and prolongs the life of your pedals.
5. Overlooking Pedal Compatibility:
Before purchasing new pedals, ensure they are compatible with your bike’s crankset and intended riding style. Different pedal types have specific requirements, and using an incompatible pedal can lead to compatibility issues, diminished performance, and safety risks. Consult your bike manufacturer’s specifications or seek advice from a knowledgeable bike shop to choose the appropriate pedals for your bike.
6. Rushing the Process:
Changing pedals may seem like a straightforward task, but rushing through the process can lead to mistakes and oversights. Take your time and follow each step carefully, paying attention to details such as thread alignment, proper tool usage, and torque application. By approaching the pedal-changing process with patience and focus, you minimize the chances of errors and ensure a successful outcome.
By avoiding these common mistakes and pitfalls, you can confidently change pedals on your bicycle, promoting safety, performance, and longevity. Take the time to align the threads correctly, use the appropriate tools, tighten to the proper torque, and perform regular maintenance. With these practices in place, you can enjoy the benefits of optimal pedal performance and a smooth riding experience.
The Evolution of Bicycle Pedals: From Traditional Designs to Modern Innovations
Over the years, bicycle pedals have undergone significant advancements and innovations. This section explores the evolution of pedal designs, highlighting traditional styles and modern innovations that have improved cycling performance and convenience.
Traditional Pedal Designs:
1. Platform Pedals:
Platform pedals, also known as flat pedals, are the most basic and traditional type of pedal. They feature a flat surface where the rider places their foot, providing a wide and stable platform for pedaling. These pedals are commonly found on recreational bikes, city bikes, and BMX bikes. While platform pedals lack the clipless mechanism found in advanced pedal types, they offer simplicity, easy foot placement, and the ability to use any type of footwear.
2. Toe-Clip Pedals:
Toe-clip pedals, also known as quill pedals or cage pedals, were introduced as an advancement over platform pedals. These pedals have a metal or plastic cage attached to the pedal body, allowing the rider to place their foot securely within the cage. Toe-clip pedals provide added foot retention and improved pedaling efficiency compared to platform pedals. However, they still require the use of traditional cycling shoes with a toe strap or toe clips.
Modern Innovations:
1. Clipless Pedals:
Clipless pedals revolutionized the cycling industry by introducing a more secure and efficient way of connecting the foot to the pedal. Despite the name, clipless pedals require specialized cycling shoes with cleats that “clip” into the pedal mechanism. These pedals use a retention mechanism, typically using a spring-loaded mechanism, to securely hold the cleat in place. Clipless pedals offer enhanced power transfer, improved pedaling efficiency, and reduced foot fatigue. They are commonly used in road cycling, mountain biking, and other competitive disciplines.
2. Dual-Sided Clipless Pedals:
Dual-sided clipless pedals provide the convenience of being able to engage the pedal from either side without the need to flip it over. This design eliminates the need to find the correct side of the pedal, making it easier and quicker to clip in, especially in situations where a quick start is required, such as during competitive races or mountain bike trails.
3. Hybrid Pedals:
Hybrid pedals, also known as combination pedals, aim to provide versatility by combining the benefits of both platform and clipless pedals. These pedals feature a flat platform on one side and a clipless mechanism on the other side. They allow riders to use either regular shoes or clipless cycling shoes, offering flexibility and convenience for different riding situations. Hybrid pedals are popular among commuters, touring cyclists, and those who desire the option to switch between clipless and platform pedal modes.
4. Clipless Pedals with Multiple Release Tensions:
Some clipless pedal systems offer adjustable release tensions. This feature allows riders to customize the amount of force required to disengage the cleat from the pedal. Higher release tension provides a more secure connection and is favored by experienced riders, while lower release tensions make it easier for beginners or riders who prefer a quicker disengagement.
5. Pedal Power Meter Systems:
Advancements in pedal technology have led to the integration of power meter systems within the pedal design. These pedals, equipped with built-in strain gauges, measure the force applied to the pedals and provide accurate power output data. Pedal power meters offer a convenient and versatile solution for riders looking to track their performance data without the need for additional sensors or modifications to the bicycle.
The continuous evolution of pedal designs showcases the industry’s commitment to improving cycling performance, comfort, and convenience. From the simplicity of platform pedals to the high-performance capabilities of clipless and power meter pedals, modern innovations are shaping the way cyclists pedal their way to new achievements.
Choosing the Right Pedals for Your Riding Style and Goals
Selecting the right pedals for your riding style and goals is essential for optimizing your cycling experience. This section will explore the various pedal options available and provide guidance on choosing the most suitable pedals for your specific needs.
1. Platform Pedals:
Platform pedals are a versatile choice suitable for various riding styles. They offer a wide and stable platform that allows riders to pedal comfortably in regular shoes. Platform pedals are well-suited for casual and recreational riding, commuting, and BMX cycling. They provide the freedom to quickly place and adjust your feet as needed, making them ideal for riders who frequently start and stop or prefer not to be physically connected to the pedals.
2. Clipless Pedals:
Clipless pedals are favored by many road cyclists, mountain bikers, and competitive riders due to the secure connection they provide between the foot and the pedal. These pedals require compatible cycling shoes with cleats that clip into the pedal mechanism. Clipless pedals offer increased power transfer efficiency, enhanced pedaling dynamics, and improved stability during aggressive and off-road riding. They are particularly beneficial for cyclists seeking to maximize performance, endurance, and speed.
3. Hybrid Pedals:
Hybrid pedals offer the best of both worlds by combining the benefits of platform pedals and clipless pedals. These pedals feature a dual-sided design, with one side featuring a flat platform for regular shoes and the other side incorporating a clipless mechanism for cycling shoes. Hybrid pedals provide versatility and convenience, allowing riders to switch between different shoe options and ride styles. They are popular among commuters, recreational cyclists, and touring riders who desire flexibility and the ability to adapt to different riding scenarios.
4. Mountain Bike-Specific Pedals:
Mountain biking presents unique challenges that require specialized pedals. Mountain bike-specific pedals are designed to withstand aggressive off-road riding, provide reliable traction, and allow for easy engagement and disengagement. Within this category, there are various options, including clipless pedals with mud-shedding capabilities and platform pedals with pins or spikes for enhanced grip. Choosing the right mountain bike pedals depends on factors such as terrain, riding style, and personal preferences.
5. Road-Specific Pedals:
Road cycling demands high efficiency and maximum power transfer. Road-specific clipless pedals are designed to optimize performance on paved surfaces. These pedals are often lightweight, aerodynamic, and engineered to offer a secure connection between the foot and pedal. They typically have a larger contact area and a more rigid pedal body, enhancing power transfer efficiency and stability while minimizing weight.
6. Considerations for Pedal Systems:
When choosing pedals, it’s important to consider factors such as shoe compatibility, ease of engagement and disengagement, float adjustment options, and release tension. Different pedal systems offer varying degrees of adjustability and customization. It’s helpful to try different pedal systems and assess their compatibility with your cycling shoes, ease of use, and overall comfort before committing to a specific pedal system.
7. Seeking Professional Advice:
If you’re unsure about the ideal pedal choice for your riding style and goals, seeking advice from a knowledgeable bike shop or professional bike fitter can be invaluable. They can help assess your needs, consider factors such as riding style, experience level, and bike setup, and recommend the most suitable pedal options to enhance your cycling performance and enjoyment.
Conclusion:
Mastering the skill of changing bike pedals is an essential aspect of bicycle maintenance and customization. Through this comprehensive guide, we have explored the importance of proper pedal installation and removal, the tools required for changing pedals, best practices, common mistakes to avoid, and the evolution of pedal designs. By understanding these key points, cyclists can confidently and effectively change pedals, ensuring a smooth and safe riding experience.
Proper pedal installation and removal are paramount to maintaining stability, efficiency, and safety while cycling. Securely attaching pedals prevents pedal slippage, enhances power transfer, and reduces the risk of accidents. Additionally, being able to customize pedal types allows riders to optimize their cycling experience for different riding styles and goals.
To successfully change pedals, it is crucial to use the correct tools, align threads properly, avoid cross-threading, and apply appropriate torque. Adequate maintenance of pedals, such as regular cleaning, lubrication, and inspection, contributes to their longevity and performance.
When selecting pedal options, consider the specific needs of your riding style and goals. Platform pedals offer versatility, clipless pedals provide enhanced power transfer, and hybrid pedals offer flexibility. Mountain biking and road cycling often demand specialized pedal designs to withstand rough terrains or maximize efficiency.
If you are unsure about the most suitable pedal choice, seek advice from professionals or trusted bike shops. They can offer personalized recommendations based on your riding style, experience level, and bike setup.
In conclusion, changing bike pedals is a skill worth mastering for any cyclist. By following the guidelines and understanding the various pedal options available, riders can enhance their performance, comfort, and overall enjoyment on the bike.
So, next time you hop on your bicycle, take a moment to consider the pedals beneath your feet. Are they providing the right connection and enhancing your riding experience? Remember, the pedals are your gateway to the ride, ensuring each pedal stroke propels you forward with power and confidence. Choose wisely, maintain them diligently, and unlock your true cycling potential.
Now, it’s up to you. Are you ready to step up your pedal game and explore the endless possibilities that lie ahead? Share your pedal-changing experiences, preferences, and recommendations with fellow cyclists, and together, let’s continue pushing the boundaries of cycling excellence.